


Hanoi's Jupyter
March 27, 2026
"Him that overcometh will I make a pillar in the temple of my God,
and he shall go no more out:
and I will write upon him the name of my God,
and the name of the city of my God, which is new Jerusalem,
which cometh down out of heaven from my God:
and I will write upon him my new name."
— Revelation 3:12 (King James Version)
ps -eo user,%cpu --no-headers | awk '{cpu[$1]+=$2} END {for (u in cpu) print u, cpu[u]}' | sort -k2 -nr | headps -eo user,%mem --no-headers | awk '{mem[$1]+=$2} END {for (u in mem) print u, mem[u]}' | sort -k2 -nr | headCFFF平台
| DSW | CPU | Mem (GB) | Port | jupyter | - |
|---|---|---|---|---|---|
| The_Mighty_God | 60 | 1450 | 30299 | dsw-33823 | 2604 |
| Counsellor | 80 | 1750 | 30267 | dsw-30794 | 1515 |
| Wonderful | 18 | 630 | 30106 | dsw-37463 | - |
| Ever_lasting_father | 80 | 1000 (1GPU) | 30298 | dsw-37377 | 1409 |
ssh -L 2604:127.0.0.1:8088 -R 127.0.0.1:17897:127.0.0.1:7897 -p 30299 zy_22111220045@10.193.2.99

ssh -N -L 2604:127.0.0.1:8088 -p 30299 zy_22111220045@10.193.2.99
# http://localhost:2604/dsw-33823/lab/tree/Tanzimat
ssh -L 1515:127.0.0.1:8088 -p 30267 zy_22111220045@10.193.2.99 -R 127.0.0.1:17897:127.0.0.1:7897
ssh -N -L 1515:127.0.0.1:8088 -p 30267 zy_22111220045@10.193.2.99
# http://localhost:1515/dsw-30794/lab/tree/Janissaryssh -N -L 1409:127.0.0.1:8088 -p 30298 zy_22111220045@10.193.2.99 -R 127.0.0.1:17897:127.0.0.1:7897
ssh -L 1409:127.0.0.1:8088 -p 30298 zy_22111220045@10.193.2.99
# http://localhost:1409/dsw-37377/lab/tree/ssh -N -L 2604:127.0.0.1:8088 -R 127.0.0.1:17897:127.0.0.1:7897 -p 30336 zy_22111220045@10.193.2.99
ssh -N -L 2604:127.0.0.1:8088 -p 30143 zy_22111220045@10.193.2.99
# http://localhost:2604/dsw-33823/lab/tree/主要目的:解决连上梯子之后打不开cfff的问题。
※〇确保SSH正确运行
这是最重要的前提!!!!
在DSW端运行:
ps -ef | grep '[s]shd'
command -v sshd有输出,证明这个镜像安装了sshd并正在正确运行;
否则就是所选的这个镜像过于新或者压根儿没有安装sshd;
由于安装sshd的过程过于曲折,但还想选一个相对干净的镜像的话,建议选择下面两个:
master0:5000/eflops/py3.6-torch1.8-cuda11.1-rdma5.2-sshd-ubuntu18.04
master0:5000/eflops/sshd:v1
# 即名字里至少带有`sshd`有的镜像干净到sudo和chmod这样的命令都没有……;
正式开始
创建一个实例之后,可以在实例界面的操作下面点击远程连接,获得下面的一行命令
ssh -p 30089 zy_22111220045@10.193.2.99上面的命令直接在电脑终端运行,即就是正常打开一个CFFF上的一个终端。
好命令,不过我要稍作修改()
①本地运行
ssh -N -L 1515:127.0.0.1:8088 -p 30089 zy_22111220045@10.193.2.99
ssh -N -L 2604:127.0.0.1:8088 -p 30143 zy_22111220045@10.193.2.99上面的1515可以换为任意端口号,对应在自己电脑打开的端口。
上面的8088是固定的(应该),来自在DSW平台下面命令的查看
jupyter server list
Currently running servers:
http://127.0.0.1:8088/dsw-30794/ :: /cpfs01/projects-HDD/cfff-afe2df89e32e_HDD/zy_22111220045
http://127.0.0.1:8088/dsw-30794/ :: /cpfs01/projects-HDD/cfff-afe2df89e32e_HDD/zy_22111220045
抑或是:
/etc/dsw/bin/jupyter server list
Currently running servers:
http://127.0.0.1:8088/dsw-33818/ :: /cpfs01/projects-HDD/cfff-afe2df89e32e_HDD/zy_22111220045
②浏览器中输入
上面命令运行之后,输入密码之后即可在浏览器中直接打开
http://localhost:1515/dsw-30794/
http://127.0.0.1:1515/dsw-30794/
# 或者
http://localhost:2604/dsw-33823/lab?
http://127.0.0.1:2604/dsw-33823/lab?然后打开之后就是和CFFF上直接打开相同的页面了。要说有什么用,就是后面这个方法在打开梯子的时候仍可运行。
③进阶:本地VSCode
同样的,可以使用VSCode调用服务器上的kernel。
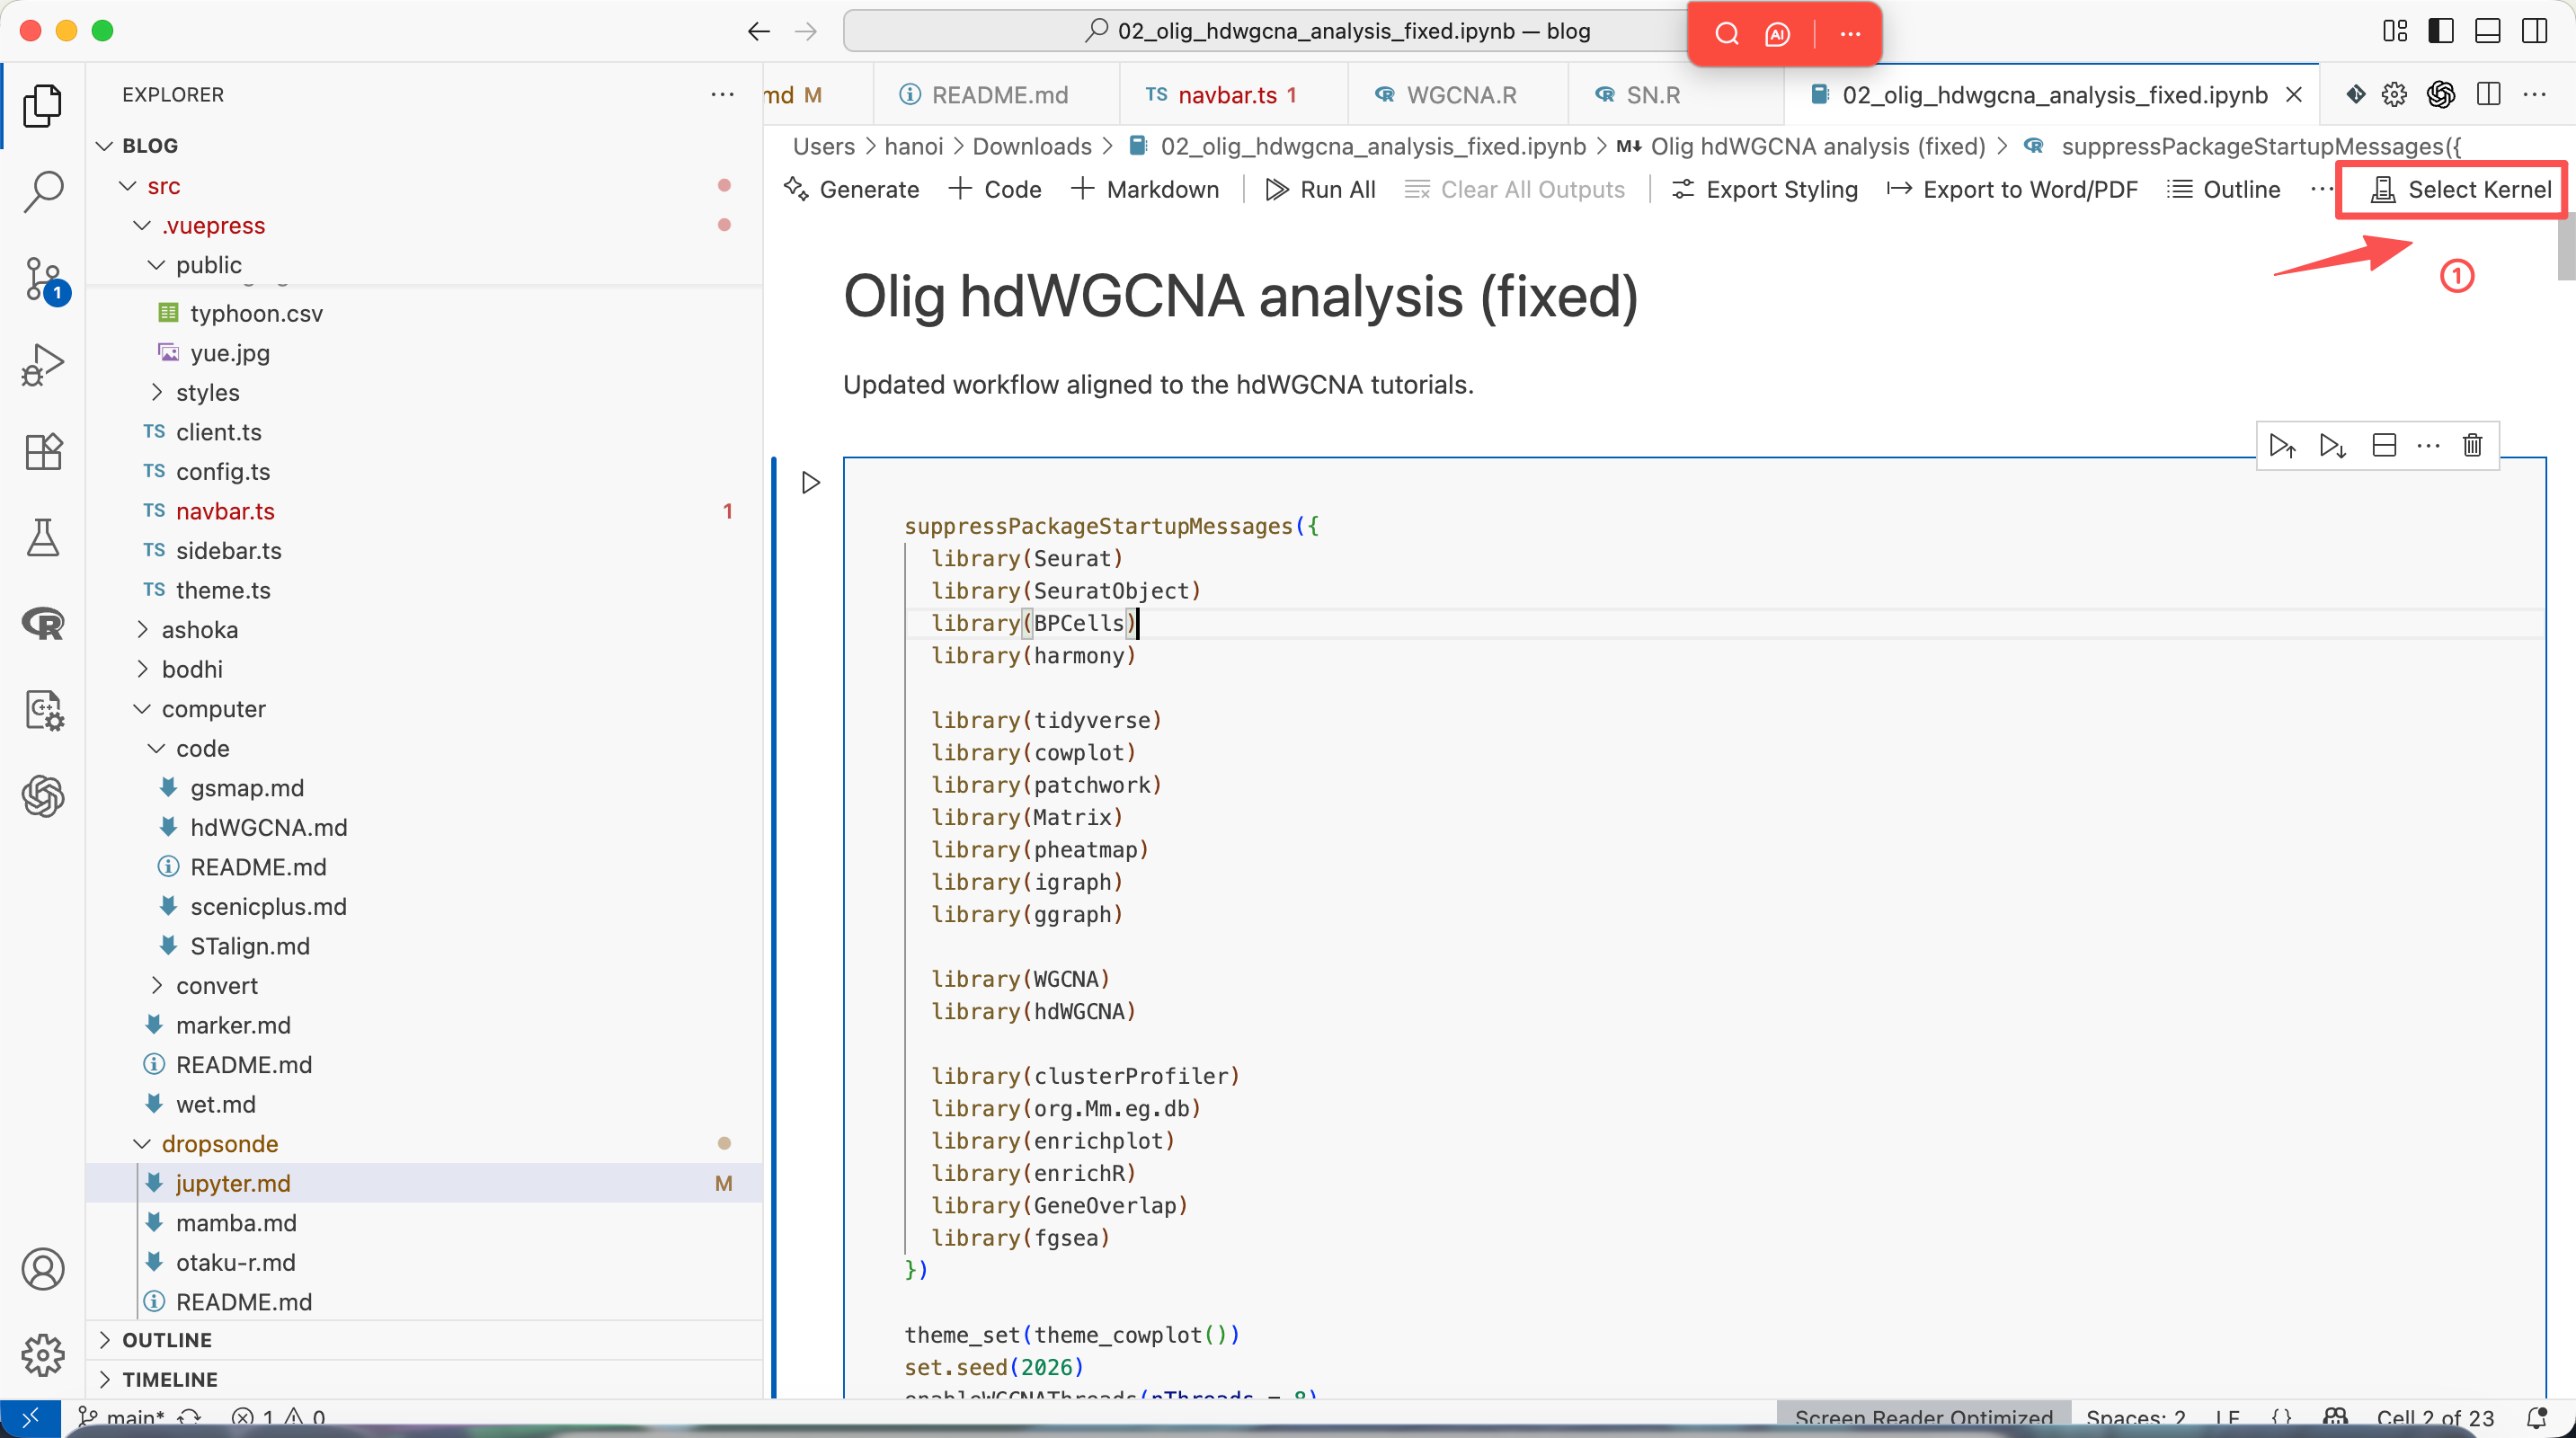
第y①步:为一个jupyter notebook选择一个kernel
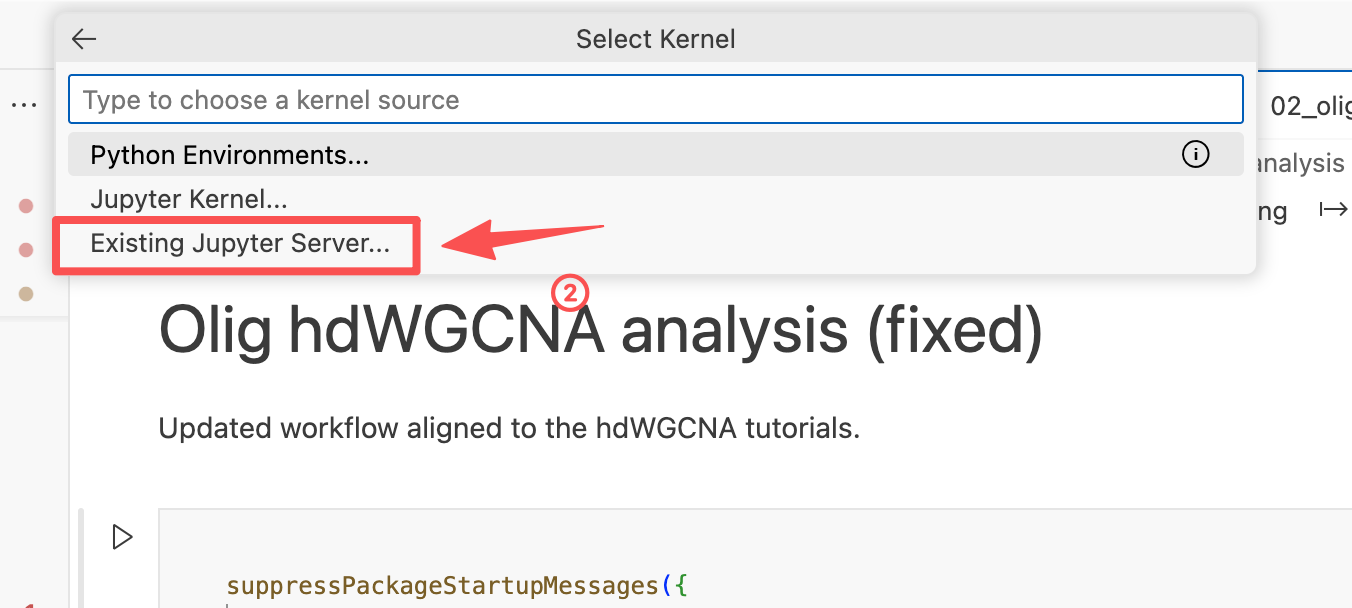
第②步:中间步骤
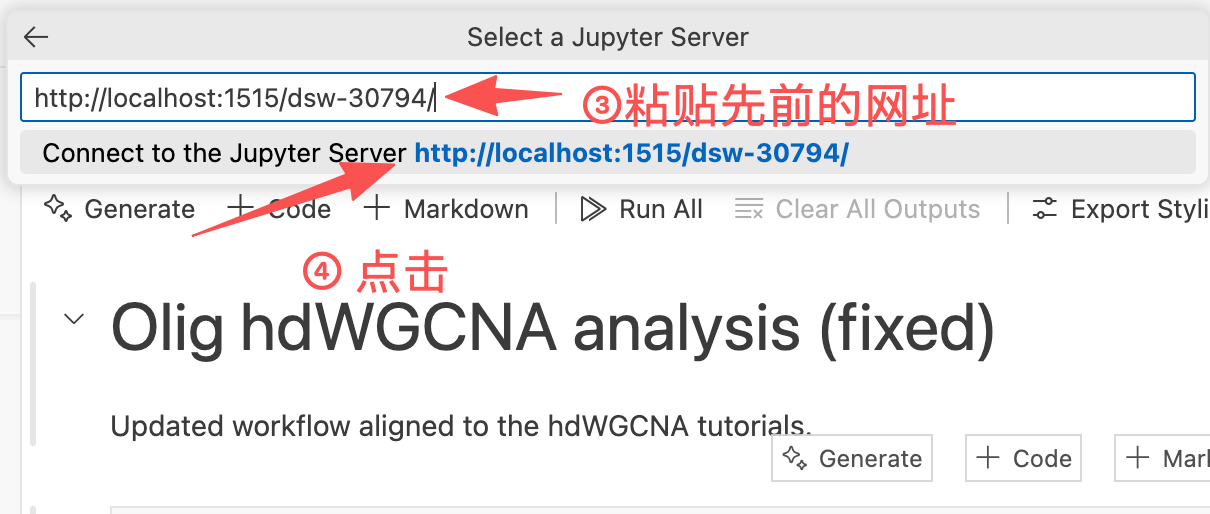
第③步:链接远程jupyter lab
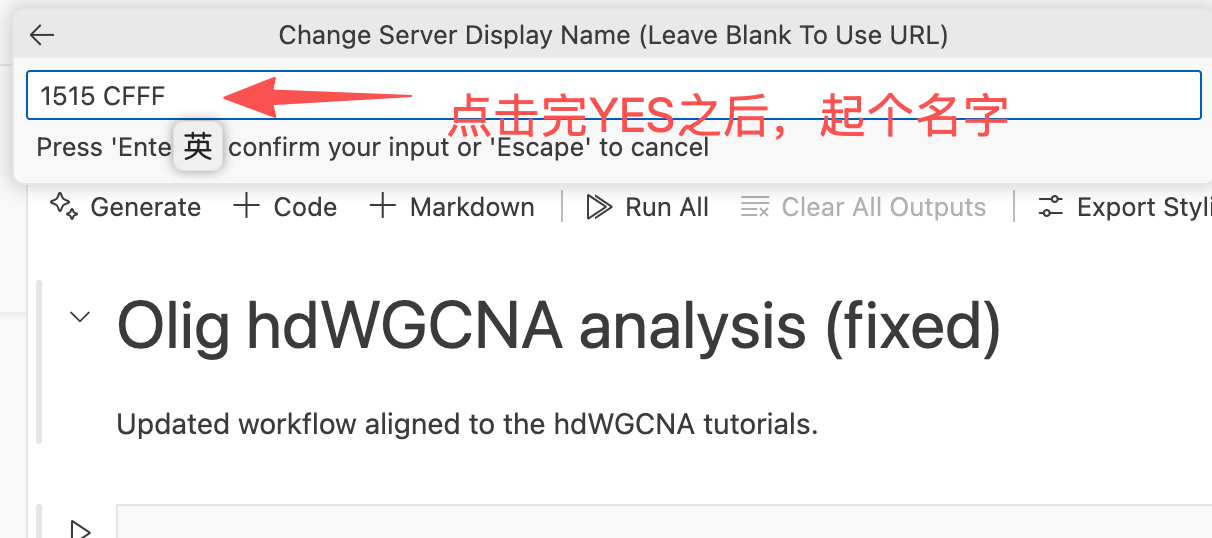
第④步:后续使用
更新后版本(类脑服务器现行版)
对nodecw1到nodecw12实行jupyter runtime和(主要是)jupyter config分离制度,实现kernel隔离。
# nodecw1
~/bin/start_jlab.sh 1513
# nodecw2
~/bin/start_jlab.sh 8686
# nodecw3
~/bin/start_jlab.sh 1705
# nodecw4
~/bin/start_jlab.sh 1323
# nodecw5
~/bin/start_jlab.sh 2216
# nodecw6
~/bin/start_jlab.sh 2114
# nodecw7
~/bin/start_jlab.sh 2222
# nodecw8  →Permission Denied
~/bin/start_jlab.sh 1919
# gpucw1
~/bin/start_jlab.sh 9999
# nodecw9  →Permission Denied
~/bin/start_jlab.sh 2122
# nodecw10 →Permission Denied
~/bin/start_jlab.sh 1013
# nodecw11
~/bin/start_jlab.sh 1614
# nodecw12
~/bin/start_jlab.sh 1224
# nodecw13 →Permission Denied
~/bin/start_jlab.sh 1330启动jupyter的文件:~/bin/start_jlab.sh
#!/usr/bin/env bash
set -euo pipefail

PORT="${1:?usage: start_jlab.sh <port>}"
NODE="$(hostname -s)"

BASE_DIR="$HOME/.jupyter_instances/${NODE}_${PORT}"
RUNTIME_DIR="$BASE_DIR/runtime"
CONFIG_DIR="$BASE_DIR/config"
LOG_DIR="$HOME/jupyter_log"

mkdir -p "$RUNTIME_DIR" "$CONFIG_DIR" "$LOG_DIR"


export JUPYTER_RUNTIME_DIR="$RUNTIME_DIR"


export JUPYTER_CONFIG_DIR="$CONFIG_DIR"


if [ -f "$HOME/.jupyter/jupyter_server_config.py" ] && [ ! -f "$CONFIG_DIR/jupyter_server_config.py" ]; then
    cp "$HOME/.jupyter/jupyter_server_config.py" "$CONFIG_DIR/jupyter_server_config.py"
fi

if [ -f "$HOME/.jupyter/jupyter_server_config.json" ] && [ ! -f "$CONFIG_DIR/jupyter_server_config.json" ]; then
    cp "$HOME/.jupyter/jupyter_server_config.json" "$CONFIG_DIR/jupyter_server_config.json"
fi

JUPYTER_BIN="$HOME/miniforge3/bin/jupyter"

nohup "$JUPYTER_BIN" lab \
  --ServerApp.ip=127.0.0.1 \
  --ServerApp.port="$PORT" \
  --ServerApp.open_browser=False \
  --ServerApp.root_dir="$HOME" \
  > "$LOG_DIR/log_jupyter_${PORT}_${NODE}.log" 2>&1 &

echo $! > "$BASE_DIR/jupyter.pid"

echo "Started JupyterLab on node=$NODE port=$PORT"
echo "Runtime dir: $JUPYTER_RUNTIME_DIR"
echo "Config dir : $JUPYTER_CONFIG_DIR"
echo "Log file   : $LOG_DIR/log_jupyter_${PORT}_${NODE}.log"
jupyter基础信息查看命令
jupyter --paths
jupyter server --show-config
jupyter kernelspec list
kernel管理
python创建
mamba create -n py311 python=3.11 ipykernel -y
mamba activate py311
python -m ipykernel install --user --name py311 --display-name "Python (py311)"
R创建
mamba create -n r4 r-base -y
mamba activate r4
R
然后运行
mamba install r-irkernel -y
Rscript -e 'IRkernel::installspec(user = TRUE, name = "otaku", displayname = "Otaku")'
或者:
install.packages("IRkernel")# , repos="https://cloud.r-project.org")
IRkernel::installspec(user = TRUE, name = "ir-r4", displayname = "R (r4)")
q()
kernel卸载
jupyter kernelspec list

jupyter kernelspec uninstall <kernel_name>
附:重新搭建Jupyter
安装&基础配置生成
mamba activate base
mamba install jupyter -y
jupyter server --generate-config
# Writing default config to: '/cwStorage/home/chenzhh/.jupyter/jupyter_server_config.py'
设置密码
jupyter server password
# Enter password:
# Verify password:
查看当前运行的jupyter
jupyter server list
# Currently running servers:
# http://localhost:1224/ :: /cwStorage/home/chenzh
关掉
jupyter server stop 1224启动
nohup jupyter lab --config="$HOME/.jupyter/jupyter_server_config.py" \
  > "$HOME/jupyter_log/log_jupyter_1224_$(hostname).log" 2>&1 &
之前的运行方法-备案(不建议)
mamba activate base

nohup jupyter lab --port=2222 --no-browser 2>&1 >log_jupyter_2222nodecw7.log &
nohup jupyter lab --port=2019 --no-browser 2>&1 >log_jupyter_2019nodeyj1.log &
nohup jupyter lab --port=1513 --no-browser 2>&1 >log_jupyter_1513nodecw1.log &
nohup jupyter lab --port=8686 --no-browser 2>&1 >log_jupyter_8686nodecw2.log &
nohup jupyter lab --port=1705 --no-browser 2>&1 >log_jupyter_1705nodecw3.log &
nohup jupyter lab --port=1323 --no-browser 2>&1 >log_jupyter_1323nodecw4.log &
nohup jupyter lab --port=2216 --no-browser 2>&1 >log_jupyter_2216nodecw5.log &
nohup jupyter lab --port=2114 --no-browser 2>&1 >log_jupyter_2114nodecw6.log &
nohup jupyter lab --port=2222 --no-browser 2>&1 >jupyter_log/log_jupyter_2222nodecw7.log &
nohup jupyter lab --port=1919 --no-browser 2>&1 >log_jupyter_1919nodecw8.log &
nohup jupyter lab --port=9999 --no-browser 2>&1 >log_jupyter_9999gpucw1.log &

nohup jupyter lab --port=2019 --no-browser 2>&1 >log_jupyter_2019nodeyj1.log &
nohup jupyter lab --port=2122 --no-browser 2>&1 >log_jupyter_2122nodecw9.log &
nohup jupyter lab --port=1013 --no-browser 2>&1 >log_jupyter_1013nodecw10.log &
nohup jupyter lab --port=1614 --no-browser 2>&1 >log_jupyter_1614nodecw11.log &
nohup jupyter lab --port=1224 --no-browser 2>&1 >log_jupyter_1224nodecw12.log &

nohup jupyter lab --port=1330 --no-browser 2>&1 >log_jupyter_1330nodecw13.log &
python -m ipykernel install --user --name=merfish --display-name "Python310 (merfish)"